
Sue Skornia’s presentation at the Q.U. Guild meeting in June 2019 is presented in a series of lessons. This one covers:
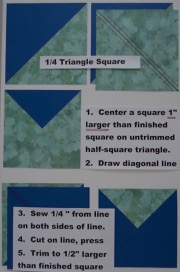
One-Quarter Triangle Square
Please scroll to the bottom for links to the rest of the lessonS
Marching on Point
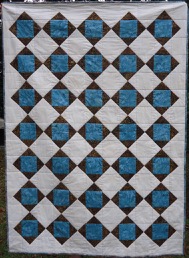
Finished Size of quilt before border 44″ x 60″ (11 X 15 blocks) (final size: 4 inch squares)
| Number to cut | # of Squares | Size to cut | Amount of fabric needed |
|---|---|---|---|
| Center squares: (med) | 35 squares | 4.5 in. x 4.5 in | 1/2 yard |
| Points: (dark) | 35 squares | 5.5 in. x 5.5 in. | 1 yard |
| Background: (light) | 48 squares | 4.5 in. x 4.5 in. | _____) |
| 12 squares | 5 in. x 5 in. | _____) >>> 3 yards | |
| 35 squares | 5.5 in. x 5.5 in. | _____) |
Mark a diagonal line, corner to corner, on the wrong side of the 35, 5.5″ x 5.5″ background squares. Pair them, right side to right side to 35 Point squares, and place pins across the line midway and near the bottom. Sew 1/4th inch from the line on both sides. Cut on the line. Press toward the dark half of the resulting half-square triangle.
Draw a diagonal line across the seam, corner to corner of 29 of these half-square triangles, place right sides together with 29 others, abutting the seam, light to dark, and place a couple pins on the line and near the bottom. Sew 1/4th inch from the line on both sides. Cut on the line. Press into hourglass blocks. Trim to 4 1/2 x 4 1/2 inch squares in this manner:
- Trim the squares to the finished size before assembly (1/2 inch larger than final size), by aligning a 6 inch square acrylic ruler along a seam and looking through the ruler to check each corner to see that all 4 seams are exactly in the corners of the 4 1/2 x 4 1/2 marks. Look 2 or 3 times. Trim 2 sides, and turn to align again. Place the trimmed edges along the 4 1/2 x 4 1/2 marks, check all the corners, then trim again.
Mark a diagonal line across the wrong side of the 12, 5″ x 5″ squares and place them right side to right side with the remaining 12 half-square triangles. Place pins across the line midway and near the bottom. Sew 1/4th inch from the line on both sides. Cut on the line. Press toward the half square.
Assemble quilt in rows as shown in the photo. Pin together with batting & backing.
Quilt vertically, horizontally and both ways diagonally with background matching thread.
Trim and bind the quilt.
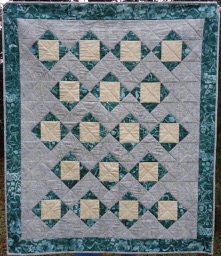
Square in a Square Lap Quilt
Final size before borders: 44″ x 44″
Backing and binding fabric: 1½ yard
Cut:
| A | 25 | 4½-inch center squares, light fabric | 1/2 yard | ||||
| B | 16 | 4½-inch center squares, dark fabric | 1/2 yard | ||||
| C | 16 | 5½-inch squares, light fabric | 1/2 yard | ||||
| D | 25 | 5½-inch squares, dark fabric | 3/4 yard | ||||
| E | 10 | 5½-inch squares light background fabric | | | ||||
| F | 20 | 4½-inch squares light background fabric | |> 3/4 yard | ||||
| G | 10 | 5-inch squares, light background fabric | | | ||||
Make 32 half-square triangles from 16 C and 16 of D, marking diagonally on C. Cut on line. Press toward the dark. Do not trim.
Match 12 CD against 12 CD, light to dark, mark diagonally and sew into quarter-square triangle blocks. Cut on line. Press. Trim to 4½” square, making sure all seams are exactly in corners.
Match 4 of D with 4 of E (background 5½) to make 8 half-square triangles blocks. Cut on line. Press toward dark. Place light to dark with remaining 8 of CD blocks to make 16 quarter- square blocks with 1 background quarter. Trim to 4½” square, making sure all seams are exactly in corners.
Match 5 of D with 5 of E to make 10 half-square triangle blocks. Mark 10 G diagonally on the wrong side, and match across DE to make 20 blocks with 3/4 of background fabric and 1/4 dark. Trim to 4½ ” square, making sure all seams are exactly in corners.
Lay out as in photo. Sew together in rows. Press toward the solid blocks.
Sew rows together. Layer and quilt in 4 directions.
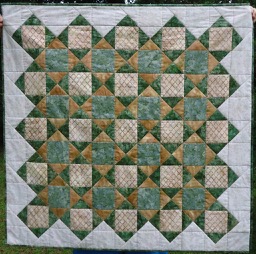
Staggered Squares on Point
Finished Size of quilt 36″ x 48″ before borders (4-inch squares)
| Size of squares before assembly needed | Number to cut | Size to cut | Amount of fabric |
|---|---|---|---|
| (4½ inches) | Centers: 13 | 4.5″ squares | 1 fat quarter |
| .Points: 18 | 5.5″ squares | 1/2 yard | |
| .Background: 18 | 5.5 ” squares | ||
| 22 | 5 ” squares | 2 yards | |
| 22 | 4.5″ squares | ||
| Backing: | 1.5 yards |
Mark a diagonal line, corner to corner, on the wrong side of the lighter 5.5″ squares. Pair right side to right side to a 5.5″ dark square and place a pin across the line midway and near the bottom.
Sew 1/4th inch from the line on both sides. Cut each on the line. Press toward the dark half of the resulting half-square triangles.
Place 7 of the half-square triangles with 7 others, seam to seam, light to dark, right side to right side, and draw a line and insert 2 pins.
Sew 1/4th inch from the line on both sides. Cut on the line. Press open.
Draw a diagonal line across the 5″ squares. Place 22 of the half-square triangles right sides together with the 5″ squares, centering the 5″ squares, so the line crosses the seam, and place a pin above the line and near the bottom.
Sew 1/4th inch from the line on both sides. Cut on the line. Press toward the half square.
- Trim the squares to the finished size before assembly (1/2 inch larger than final size), by aligning a 6 inch square acrylic ruler with the diagonal line along the seam and looking through the ruler to check each corner to see that all 4 seams are exactly in the corners of the 4 1/2 x 4 1/2 marks. Look 2 or 3 times. Trim 2 sides and turn to align again. Place the trimmed edges along the 4 1/2 x 4 1/2 marks, check all the corners, then trim again.
Assemble quilt in rows as shown in the photo.
Pin together with batting & backing.
Quilt with matching thread in the ditch in 4 directions.
Trim and bind the quilt.
More Lessons from Sue Skornia’s Presentation
General Instructions for Making and Completing Quilts
Lesson 1: Half-Square Triangles & Combinations of Half-Square Triangles with Squares
Lesson 2: Quarter-Square Triangles (hour glass) & Combinations of Quarter-Square Triangles with Squares
Lesson 3: Combination of Half-Square Triangles and Quarter-Square Triangles with Squares
Lesson 4: One-Quarter Triangle Square
Lesson 5: Floating Star